Shopify Merchant Implementation Guide
Introduction
This content is called the Shopify Merchant Take on Guide. This Learner guide provides an overview of the Merchant onboarding process on the Gateway as well as the Shopify Merchant interface and how merchants would navigate the platform to configure iVeri as their payment provider through their Shopify store.
The Guide covers the iVeri Admin Portal used by the Acquirer to onboard a Merchant and the Shopify Back end used by the Merchant to configure iVeri as their payment provider.
Objectives
The Objective of this user guide is to outline the actions on the iVeri Admin Portal and Shopify Back End interface through the use of step by step screen representations. The user guide explains in detail how the merchant interface works and the related functionalities available within Shopify.
Background Information
What is Shopify?
Shopify is an e-commerce platform that offers merchants the ability to sell their products online, receive payments from customers, and ship their products to customers. Shopify is dedicated to streamlining the ecommerce experience for merchants and their customers by offering one platform with all the e-commerce and point of sale features that merchants need to start, run, and grow their businesses.
With the partnership the iVeri Gateway is now integrated into the Shopify eCommerce platform which enables the acceptance of online payments for the merchant.
Merchant requisites for the Shopify implementation
A Merchant should have the following as a standard:
- Merchant Account
- eCommerce Merchant account that needs to be signed between the acquiring bank and merchant
- Gateway Profile
- Created as part of the merchant agreement with an acquiring bank where Shopify is loaded as a product
- Shopify Store
- A merchant signing up for Shopify
- Merchant credentials created upon onboarding of the merchant on the Gateway
Note: Shopify merchants must be enabled for 3Dsecure as a pre-requisite for this product.
How does this typically work?
- Once a merchant has created their Shopify store, they would be able to setup iVeri as their payment provider.
- The Merchant will utilise the credentials generated by the Gateway to link their Shopify store to their iVeri Gateway Merchant Profile.
- Once a merchant has completed the setup of their store and the linking of the store to the iVeri payment application, they will then be able to accept online payments.
Important Note:
When installing the iVeri Payment application, the merchant would need to use their User group, Username, and Password which is generated as part of the merchant account creation.
Shopify – Value Proposition
Benefits to the merchant
Secure, Quick and Convenient way of accepting payments.
Features
- Accept online payments via their Shopify store.
- Process Debit, Authorisations and Refunds
- Accept different payment methods (Visa, Mastercard etc.)
- PCI Compliant
- 3D Secure
Role Players
- iVeri needs to:
- Provide support to the Acquirer.
- Update configuration of the merchant on the Shopify Cardinal Server
- Merchant needs to:
- Configure and enable iVeri as the Payment provider using the iVeri provided store credentials
- Send Acquirer their Store name in order for iVeri to complete the configuration on the Shopfiy Cardinal Server
- Acquirer / Payment Service Provider needs to:
- Create the merchant profile on the iVeri payment gateway
- Enable 3D Secure for the merchant
- Provide iVeri with Merchant Store name (as it appears on the Shopify store) and Transaction types supported
Process Overview:
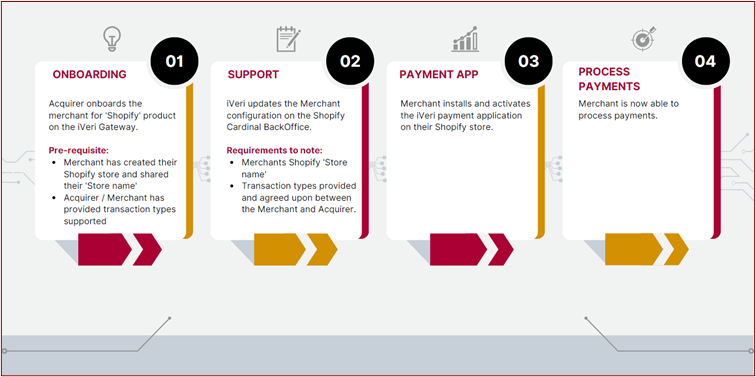
Onboarding a Merchant for Shopify
The acquirer would login to the iVeri admin portal in order to onboard, manage and configure new merchants for Shopify on the gateway. Once signed up, the merchant would receive the required credentials in order to process payments
Below are the steps to onboard a merchant for Shopify:
1. Onboarding a Merchant – User Group Capture
Login to the Admin Portal using your credentials that you would have received via e-mail.
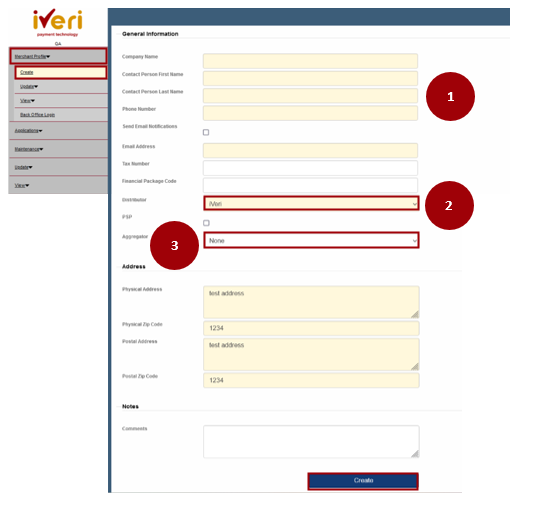
To create a merchant profile: Merchant Profile > Create.
1. Capture all the details on the form
2. Ensure that the Distributor is selected (for this example was set to iVeri)
3. ‘Aggregator’ option is used should a merchant belong to a listed payment Aggregator, and this is because the merchant agreement is between the acquirer and the Aggregator.
If ‘yes’ assign the appropriate Aggregator from the dropdown.
Note: If the merchant does not belong to an Aggregator, the Aggregator field must be left to ‘None’
Once the details are populated
Click on the ‘Create’ tab.
Important Note:
- This Association of an Integrator or Aggregator of a merchant is standard across all products, and across all Take-On Processes
- This will generate the iVeri Merchant Group ID Number which will be displayed on the screen, make note of it.
- The BackOffice Administrator password will automatically be sent to the contact persons’ email address as per the Merchant Capture Form
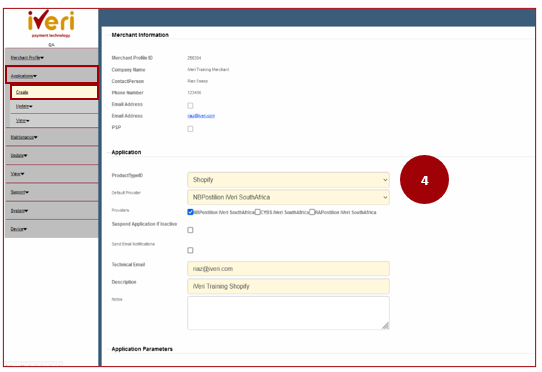
2. Application Create
You will automatically be taken to this screen. The application for Shopify would need to be completed: Applications > Create
4. Complete the mandatory fields on the form:
Under Application:
- The yellow fields are mandatory
- Ensure you select ‘ProductTypeID’ as Shopify
- Technical e-mail: Use the merchant’s email address here
- Default Provider: Set as per the Acquirer / Partner
- Ensure you select the Provider block as per the form
- Suspend Application if inactive: Select if you want the merchant to be inactive should they not trade with in 3 months, if not, leave it blank.
- Email notifications: Select to receive email notifications on this Application
- Description as per product
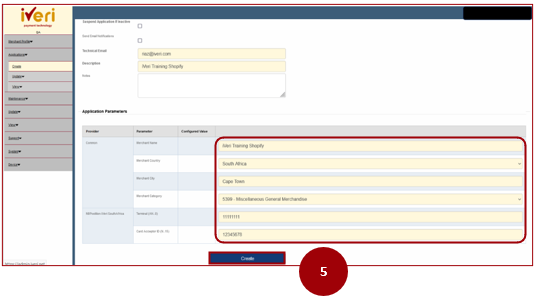
Under Application Parameters:
5. Type the Name of the Merchant under ‘Merchant Name’
Type the name of the city the merchant operates in under ‘Merchant City’
Type the ‘Merchant Country’
Merchant Category – as per the merchant
Card Acceptor ID
Select ‘Create’ once done.
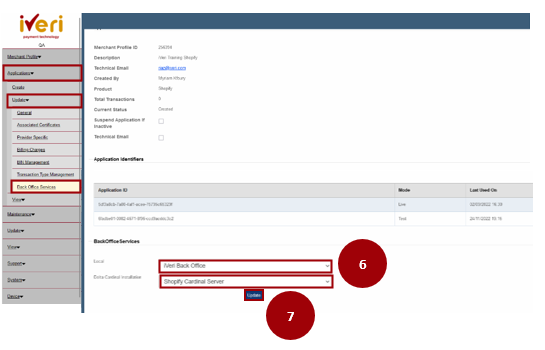
3. Configuring Back Office Services
The system will take you to BackOffice Services creation.
In order to Navigate to this screen:
Applications > Update > Back Office Services
This is where Back Office Services are created for the Merchant.
6. Select ‘iVeri back office’ under the Local dropdown. This selection depends on the distributor.
7. Delta Cardinal Installation, select Shopify Cardinal Server.
Select Update once completed.
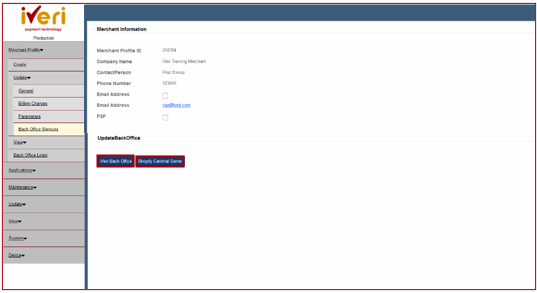
4. Update BackOffice Services
Once you have clicked update, this screen will appear.
To Navigate to this screen: Merchant Profile > Update > BackOffice Services
Select the ‘iVeri Back Office’ tab and ‘Shopify Cardinal Server tab to update and create the Backoffice services.
For this example, we will select the iVeri Back Office tab first.
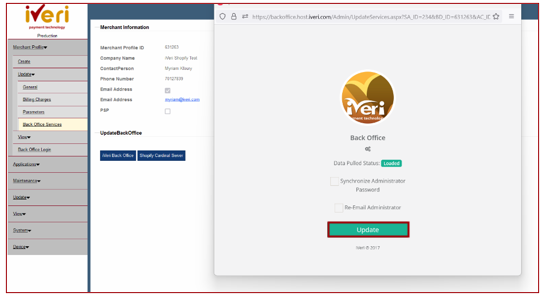
The BackOffice pop up window will then appear automatically.
Select the Update tab.
You will now be able to close the pop-up window.
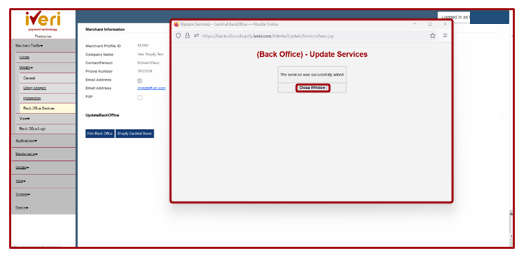
Once we have updated the iVeri BackOffice, we would need to do the same on the Shopify Cardinal Server.
Click on the ‘Shopify Cardinal Server’ tab.
The Carinal BackOffice pop up window will appear.

Now that you have updated, click on the ‘close window’ tab to close the update services browser.
Note: It is important to update BackOffice services after configurations or updates are done for a Merchant on the admin portal, in order for these changes to take effect.
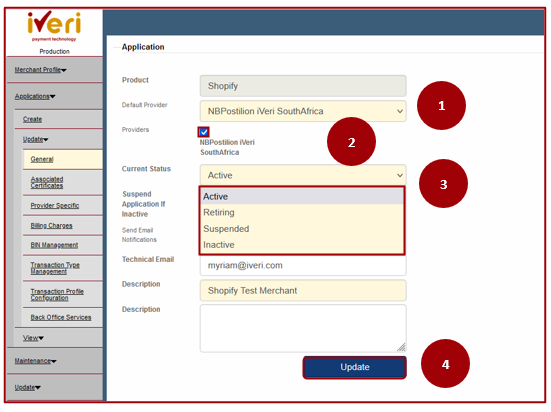
5. Enabling the Shopify Application
Now that the user has updated the BackOffice and Shopify Cardinal Server, the next step would be to enable the application.
Navigation Path: Applications > Update > General
1. Yellow fields are mandatory to complete.
2. Default Provider is set as per selection upon Application creation and depending on the acquirer. It is important that you ensure the ‘Providers’ value is also set.
3. The ‘current status’ will be defaulted to ‘Create’. From the drop down, the user will set the application to ‘Active.
4.Once the user has selected the applicable ‘Current Status’, click ‘Update’ to save changes to the application.
Note: Setting the application to ‘Active’ status is important, in order to allow the Merchant to receive payments via the Gateway for their Shopify Store.
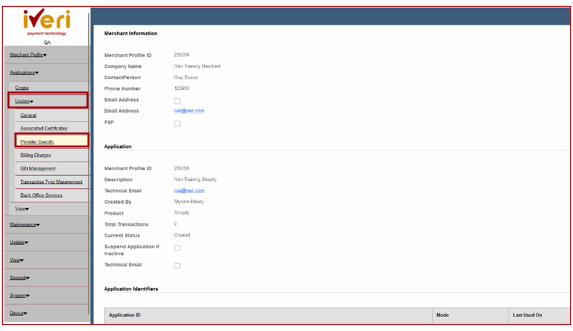
3D Secure Enablement
An additional requirement under Provider Specific, is the configuration of functions that are related to 3D Secure These requirements, however, depend on the Merchant and whether 3D Secure is enabled.
3D Secure Configuration
Navigation path: Applications > Update > Provider Specific
Select the Shopify product should the merchant have more than one product.
Ensure that we are always selecting the LIVE application.
Now that you selected the LIVE application this screen will appear.
1.From the ‘Provider’ menu, click on ‘Common Provider’ expansion button to further access menu parameters.
2.Click on the ‘ThreeD Secure’ expansion button to access the ThreeD Secure parameters
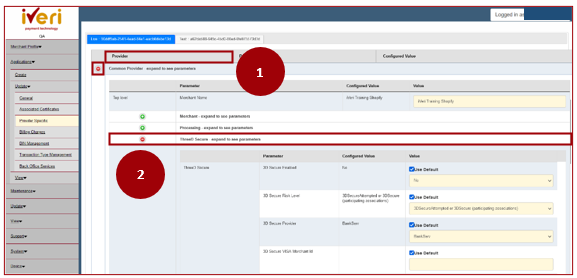
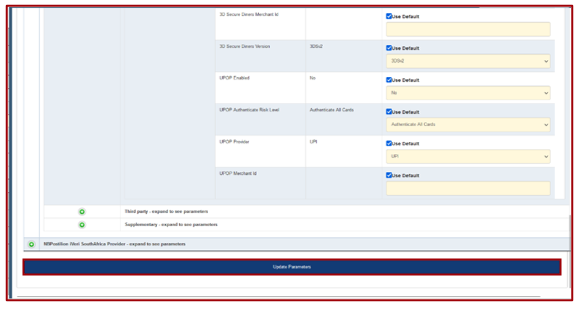
From the ThreeD Secure Parameters, you can now enable 3D Secure for the applicable card schemes.
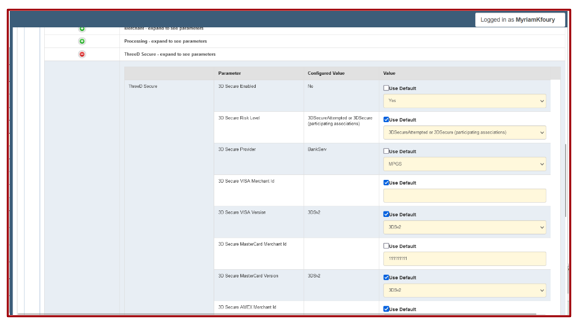
When the user would need to configure 3D Secure based on the card payment scheme that is supported by the Merchant.
3DS Secure Enabled: Untick default and change drop down to Yes
3D Secure Risk level, is dependent on the merchant agreement.
3D Secure Provider: Remains ticked as default. The acquirer would need to select the 3D secure Provider from the dropdown if 3D Secure Provider differs from default.
Depending on the Card scheme applicable:
Populate 3D Secure MasterCard Merchant ID
Populate 3D Secure Visa Card Merchant ID
Populate 3D Secure Amex Merchant ID
To ensure your 3D Secure configurations are applied, it is important that you Update Parameters at all times.
Important Note:
- If the Merchant is enabled for 3DS but is using either “Cyber Source”, “BankServ or “Netcetera” please ensure that under “3DSecure Risk Level” you select “3DSecureAttempted or 3DSecure (participating associations)”
- Ensure a BackOffice Service Update is also done
Shopify Cardinal BackOffice
Log in to the Cardinal Back Office URL: https://backoffice.shopify.iveri.com
Once you have logged into the Cardinal Backoffice, we would need to update the User Channel for Shopify.
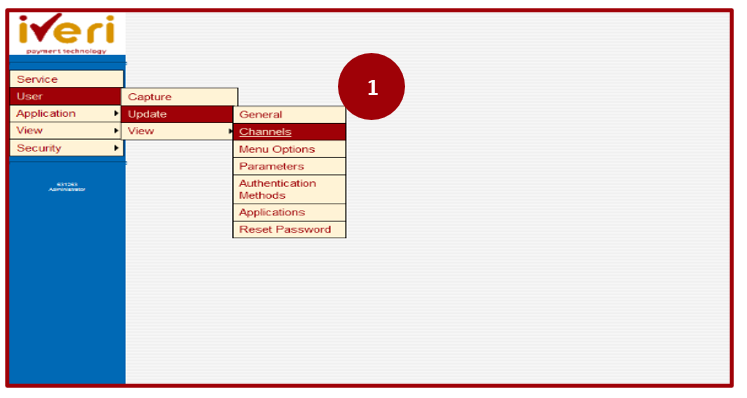
Navigation Path: User > Update > Channels
2. Using the search functionality, type in the username you would like to configure, alternatively select the ‘All’ button palette to populate the list of users.
Note: The user assigned should be the same user that will be used by the merchant to install the iVeri payment application on their Shopify store.

By configuring the Shopify channel, this will ensure that transactions that are done via the Shopify website can be processed.
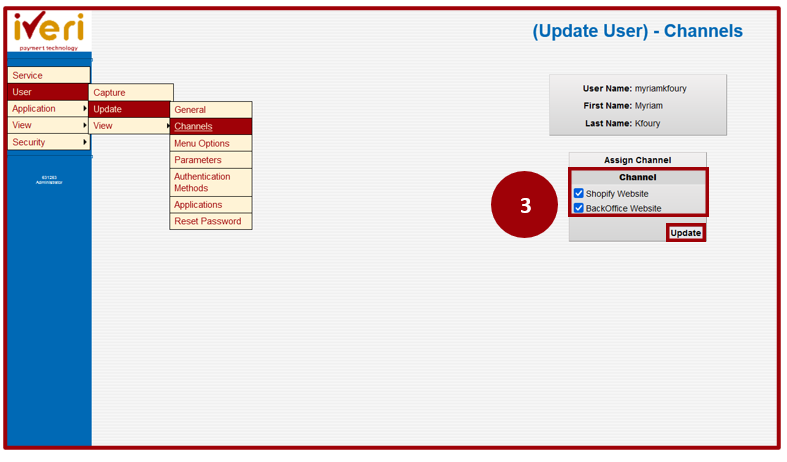
3. Here the user would need to enable the Shopify website channel to ensure that the functionality i.e., processing payments via the gateway is enabled.
The Backoffice channel will always be enabled for a user.
Once the user has ensured both Shopify and BackOffice channel has been enabled, click ‘Update’.
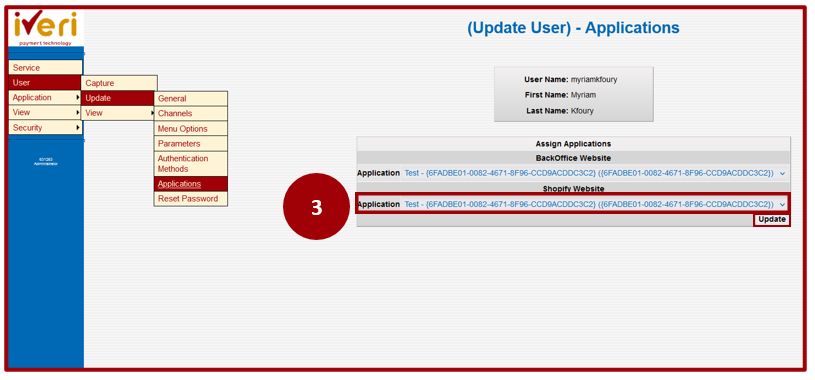
User Application Update
The user would now need to select which application would be in use for their Shopify store. There are 2 modes: Test and LIVE.
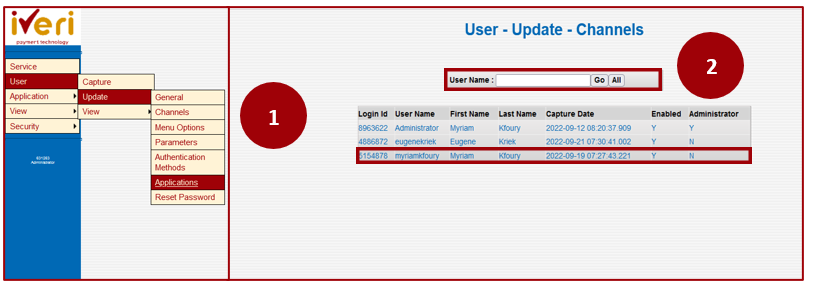
1. Navigation Path: User > Update > Applications
2. Using the search functionality, type in the username you would like to configure, alternatively select the ‘All’ button palette to populate the list of users.
Select the user application you would like to update.
As mentioned, there are 2 application modes, Test and Live.
If the Merchant is still in the process of setting up their store and would like to test payments, then using the test application would be best suited.
3. Once the merchant has setup their store and tested processing payments and would like to go LIVE on the ‘Shopify Website’ drop down, we can set their application to LIVE.
Click ‘Update’ once you have made the selection.
Update User Parameters
Updating the parameters for a Merchant’s application will enable the transactions types the Merchant will be able to process via their Shopify store.
Navigation Path: User > Update > Parameters
1.Using the search functionality, type in the username you would like to configure, alternatively select the ‘All’ button palette to populate the list of users.
2. Select the user application you would like to update.
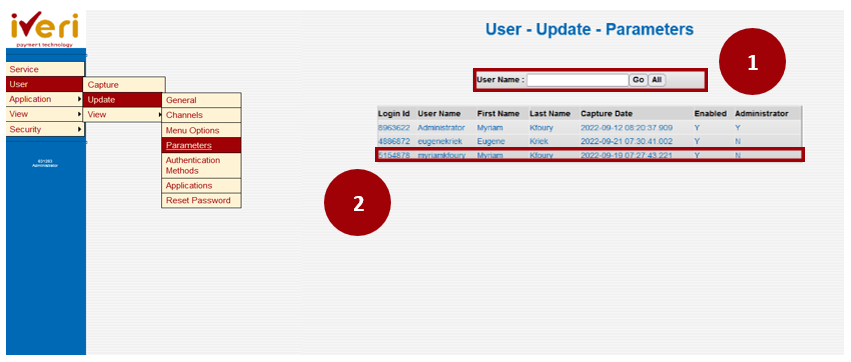
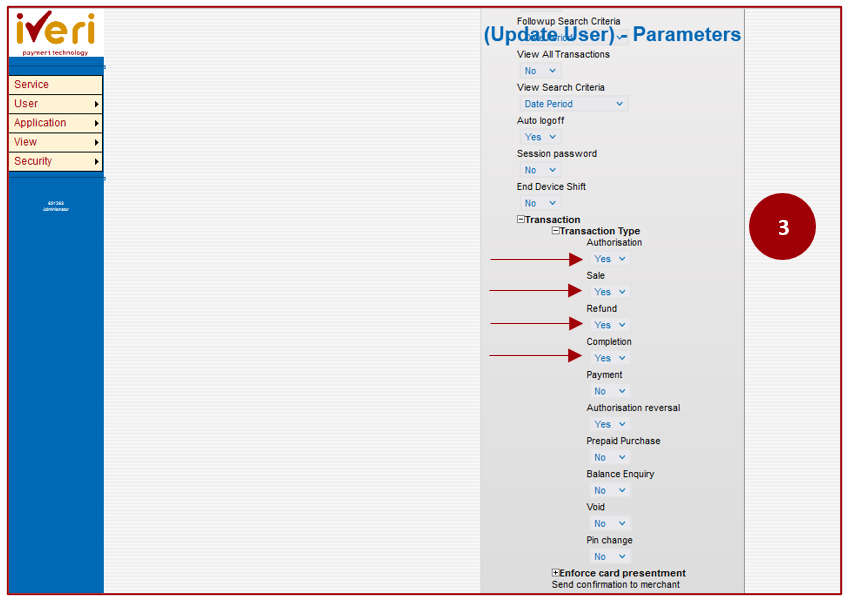
3. The Cardinal Backoffice Parameters is where a user will enable the transaction types for a Shopify merchant.
The user would need to select ‘Transaction’ and expand on the ‘Transaction type’ to view and set transaction parameters.
From the example, the user has configured the parameters applicable to the Shopify Merchant.
Note: The parameters listed are according to what Shopify supports. Based on the agreement between the Merchant and Acquirer, the user will then enable the applicable transaction types.
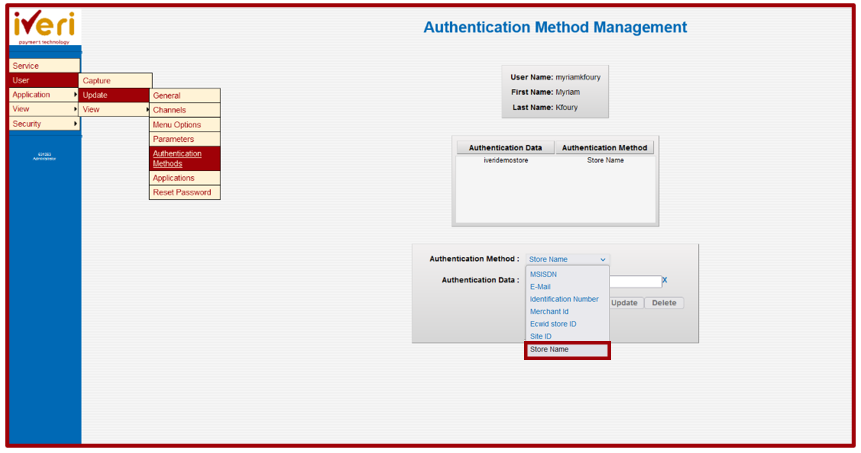
Authentication Method Management
This step is important to identify the store name, for a particular merchant using Shopify.
Navigation Path: User > Update > Authentication Methods
1. Using the search functionality, type in the username you would like to configure, alternatively select the ‘All’ button palette to populate the list of users.
Select the user application you would like to update.
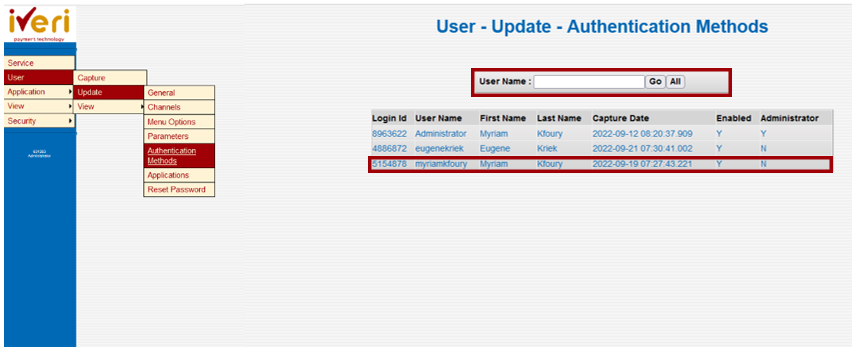
‘Authentication method’ needs to be set to set to Store name. From the drop down, select ‘Store name’.
‘Authentication Data’ is the unique naming convention used to identify the store of that created merchant.
Once captured, ‘Insert’ is then selected.

Configuring iVeri as a Payment Method
Payment Method Configuration – Back End Interface
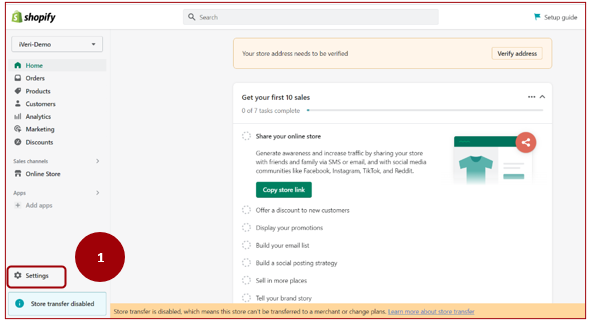
The Merchant would need to setup iVeri as their payment provider and configure the payment methods applicable.
1. From the Merchant’s homepage, the user will click on the ‘Settings’ tab
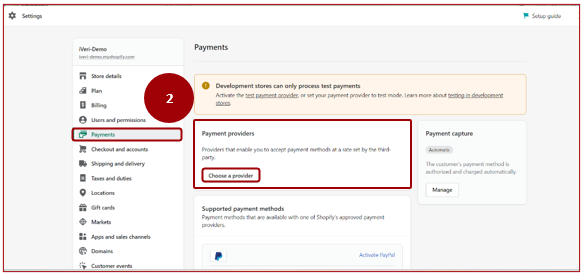
2. Here the Merchant will look to add iVeri as their payment provider.
From the settings menu the Merchant will select Payments > Payment Providers > Choose a provider.
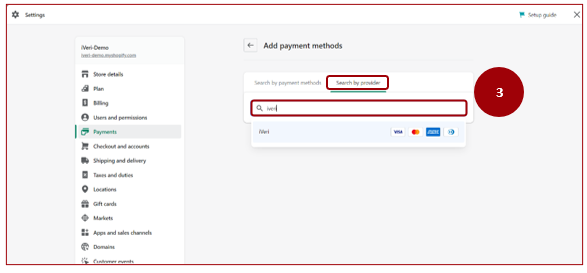
3. In order for the Merchant to search for a payment provider, click on the ‘Search by provider’ tab
From the search field, type in ‘iVeri’.
4. Once the Merchant has searched for iVeri as their payment provider, clicking on the ‘Activate’ tab.
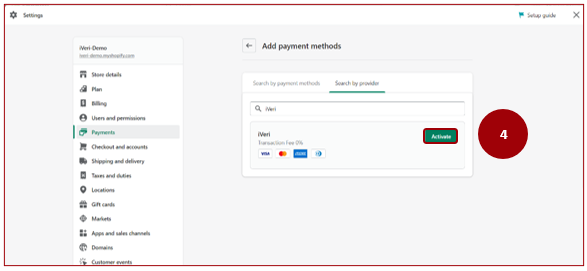
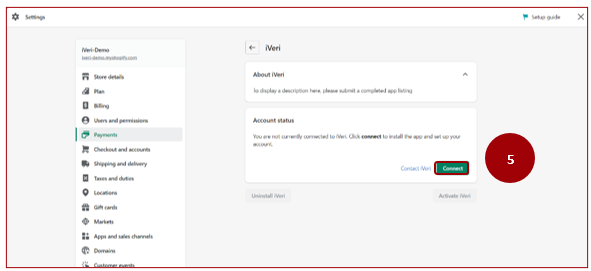
The Merchant would now need to install the iVeri payment application to setup their account to process payments.
5. In order to do so, the Merchant would need to click on the ‘Connect’ tab.
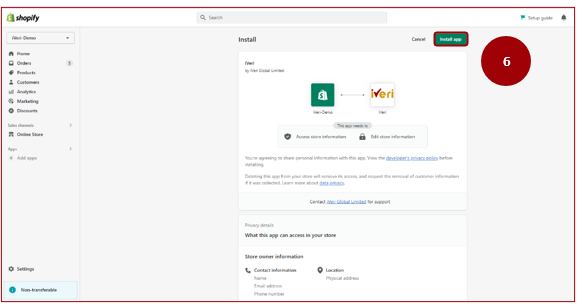
6. The Merchant would need to install the Iveri payment application by clicking on the ‘Install app’ tab.
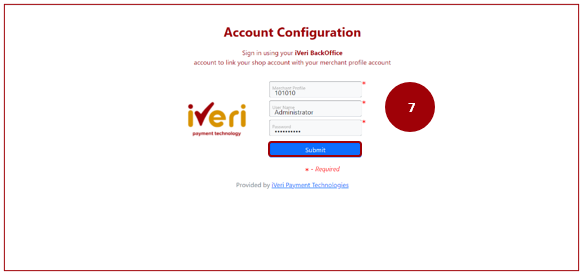
7. Insert your "Shopify Cardinal BackOffice" credentials.
These details are sent to the merchant automatically via an email notification
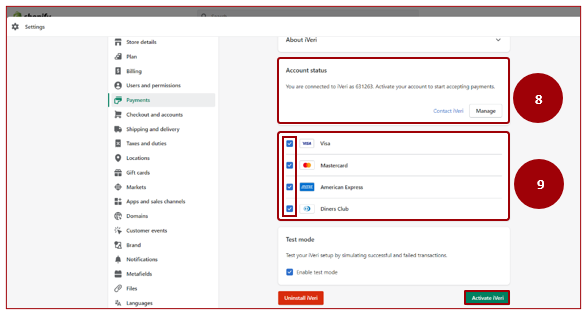
8. The account has now been linked to accept payments.
9. Select the applicable card payment schemes by ticking the boxes. This will be dependent on your acquiring bank.
Click on ‘Activate’ to save changes.
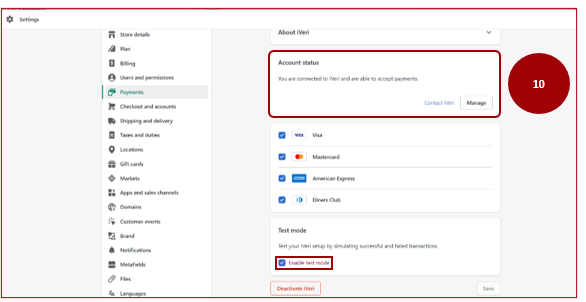
10. Upon successful activation, your account status will update confirming the successful connection to the iVeri payment application.
The Merchant will now be able to accept payments.
Enable Test Mode:
Note: Test mode is enabled to allow the merchant to Test online payments.
Once the merchant has concluded testing online payments and is ready to accept Live payments, they would need to contact their Acquirer to update their application to Live on the Cardinal server.
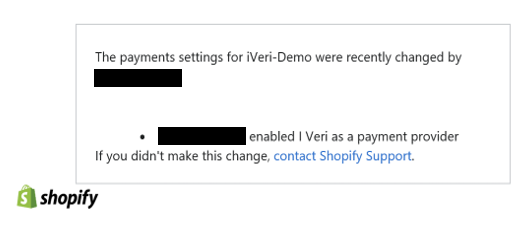
The Merchant will receive an automated e-mail notification, confirming the update and enablement of iVeri as the payment provider.
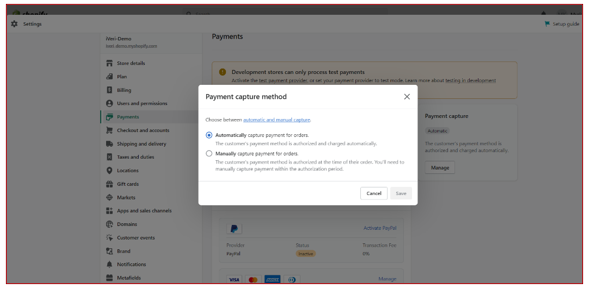
Payment Capture settings
Navigation Path: Settings > Payments > Payment Capture > Manage
The next step for the Merchant would be to setup their Payment capture method.

There are 2 Payment capture methods, Automatic and Manual:
- Authorised and charged automatically via debit order / sale
- Authorised at the time of the customer’s order in the event of authorisations or pre-auth.
Note: The payment capture method is dependent on how the merchant captures payments.
It is important that this is consistent and aligned to Payment types configured on the iVeri Gateway.
How to make a payment on the Online Store – Online Store Interface
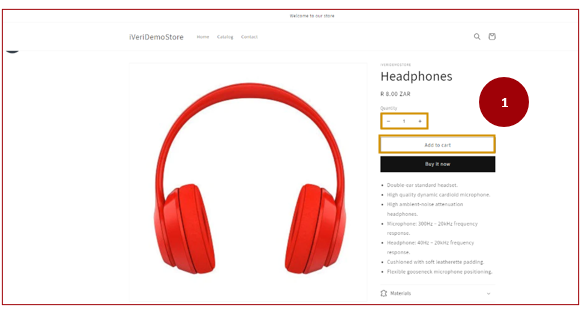
1. Make a selection on what you want to purchase.
You can select the quantity you would like to purchase and then proceed by clicking ‘Add to Cart’
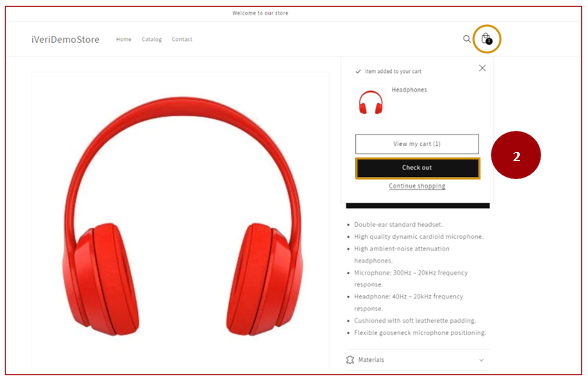
2. Once you have selected the item you would like to purchase, select ‘Check out’
Here you can either select Checkout or select the Bag icon it is still the same.
3. Insert your contact information (email address / mobile phone number) and billing address.
Select the ‘Continue to payment’ tab to proceed.
Note: This cardholder email is used to send the correspondent updates regarding the transaction and order status updates.

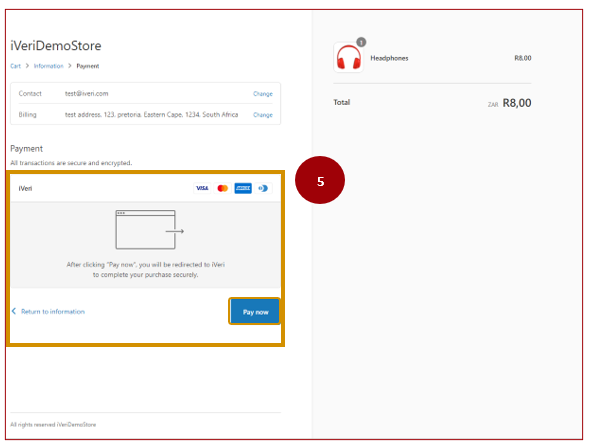
4. Once the user is happy with their selection and would like to proceed with payment, Select the ‘Pay now’ tab.
This will redirect the user to the iVeri hosted payment page.
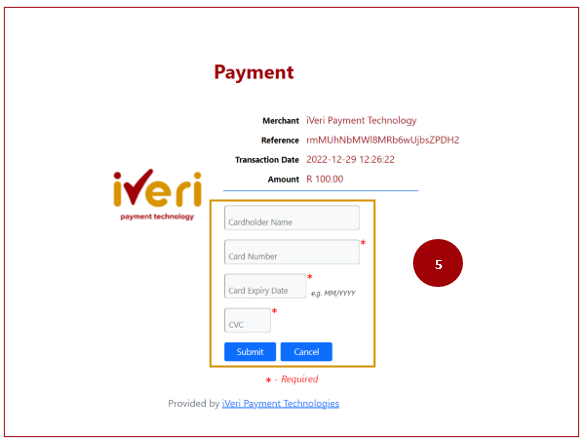
5. Cardholder is to capture the card details to complete the transaction.
Select Submit to process payment.
6. In this example 3DS is enabled for this merchant.
Transaction is processed for 3DSecure.
7. Cardholder would insert the Secure Password sent to them.
Click ‘Submit’
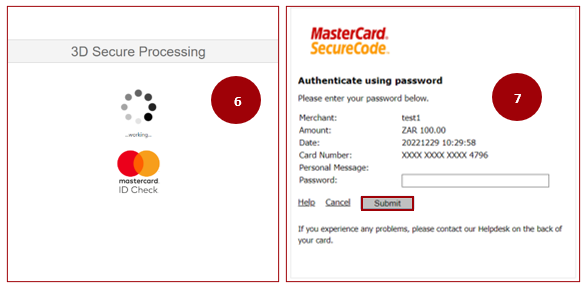
Please Note!
If the Acquirer uses 3DS as an authentication method, the card holder will go through the 3DS authentication process as shown in the above example.
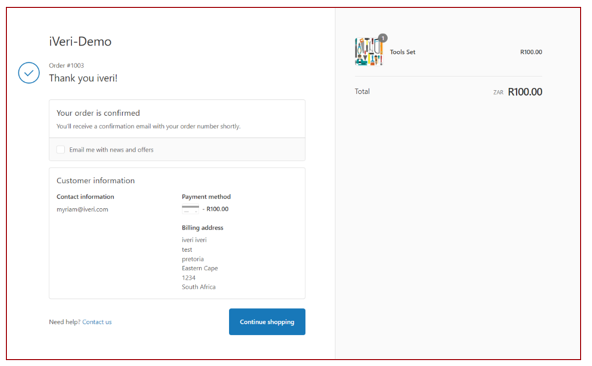
Wait a few seconds to allow for the response.
This response indicates the payment has been successful.
The card holder will also receive a notification e-mail with the confirmation details of the order.
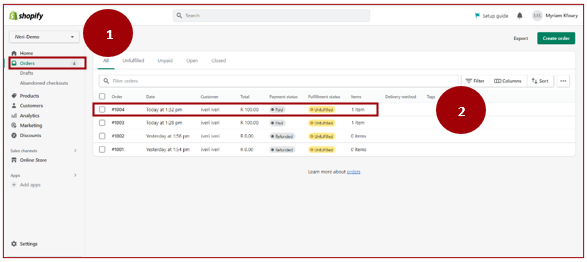
Order Status and Tracking
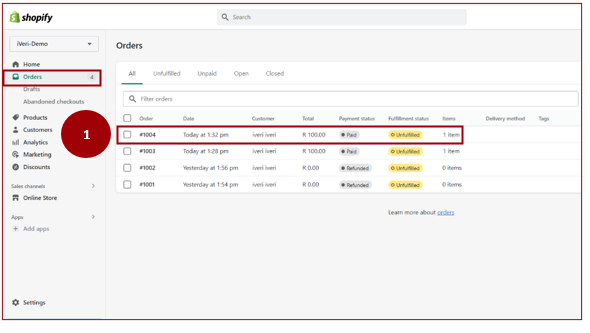
1. By clicking on the ‘Orders’ tab the merchant will be able to track:
- Order numbers
- Date of order
- Customer details
- Payment Status
- Fulfilment status
- Delivery method if applicable
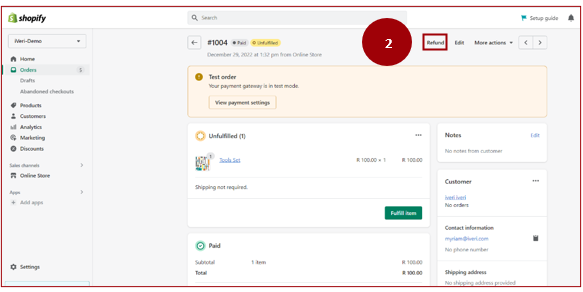
2. In order for the Merchant to view specific order details related to an order, click on the order you would like to view.
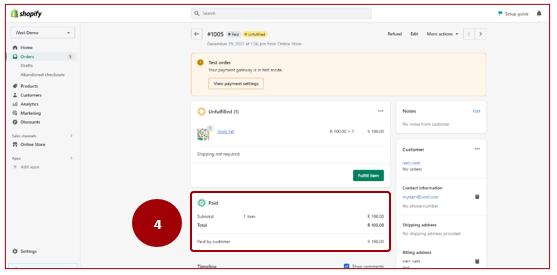
3. In this example, we are viewing the details related to order #1004.
The details indicate that the status of this order reflects as Paid.
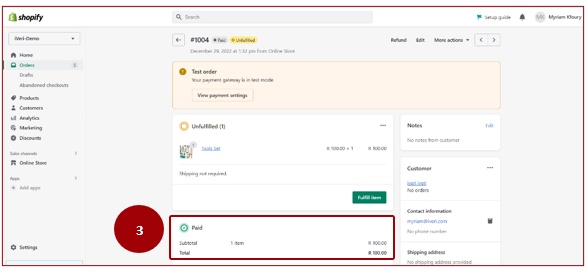
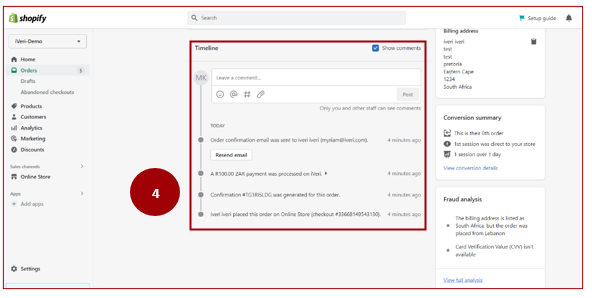
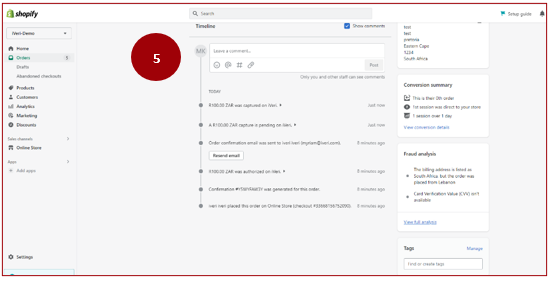
4. By scrolling down, the Merchant is able to view the timeline related to this specific order.
From the timeline, the Merchant is able to track every action that has taken place on a specific order.
Processing Refunds
1. In order to perform a refund, the Merchant will navigate to the ‘Orders’ tab and select the order they would like to perform the refund for.
2. Merchant would now navigate and click the ‘Refund’ tab.
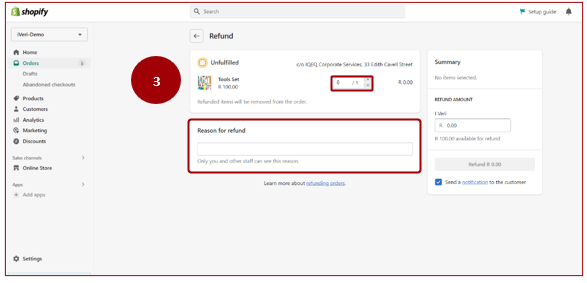
3. From the Refund tab, the Merchant would set the quantity they would need to refund.
The Merchant may also provide a reason for the refund that will be visible for internal purposes.
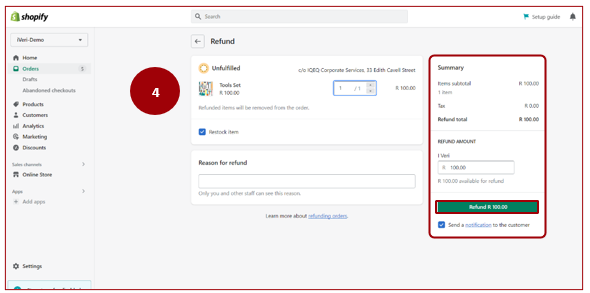
4. This screenshot shows a completed refund.
The Merchant has completed the quantity that will be refunded as well as the amount that will be refunded to the customer.
Once this is done, the Merchant will click the ‘Refund tab’ to confirm the refund.
Note: It is important that you tick the box to send a notification to the customer relating to the refund.
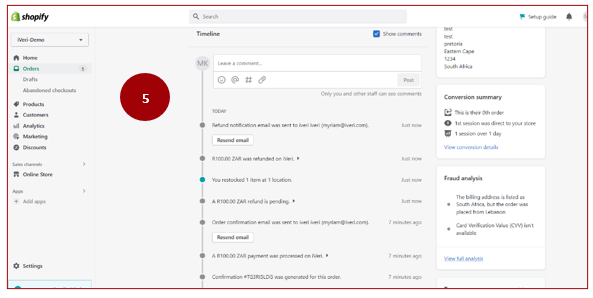
5. The Merchant can also track via the timeline, if the refund has been successful.
The Merchant and the Customer will both receive notification e-mails of the successful processing of the refund.
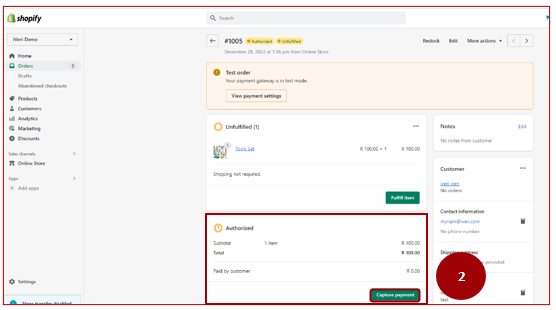
Processing Authorised Orders
The authorised status may be applicable to Merchants in specific industries where an additional step is required in order to capture payment.
1. From the Orders tab, the Merchant will select the order they would like to authorise payment for.

Please Note!
The Transaction types (sale, refunds, authorisations etc.) performed by a Merchant, will be according to the agreement between the Merchant and the Acquirer.
These transaction types must be configured via the Shopify cardinal server in order for the Merchant to perform these transaction types.
2. Here the Merchant will navigate to the ‘Authorised’ tab and click ‘Capture Payment’.
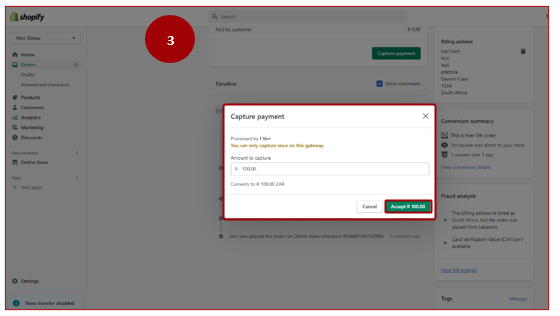
3. Here the Merchant is able to capture payment and set the amount that needs to be captured.
Click on the ‘Accept’ tab.
4. Once the Merchant has captured payment, the ‘Paid’ column will now reflect on the order.
5. All updates and actions will reflect on the Order timeline for the Merchant to track.
The timeline reflects the amount successfully captured.
Support process with Shopify:
The iVeri support team may receive technical queries / challenges a Merchant may have related to their Shopify Store. It is therefore important that you are aware of the support channels available.
Below we have outline the support channels, information to be provided and some tip that you may find helpful when faced with a technical query from a Merchant.
|
Support Process |
|
|
Support Channel |
iVeri being a Shopify Partner, can reach out to the support team via the Partner Portal: |
|
What to provide |
Details about the issue like example orders or a particular API (Application Programming Interface) call/request. Note: Shopify's log retention policy for API issues is 2 weeks, so recent examples are needed for them to check. |
|
Tip |
Shopify support advises to request the merchant to provide "Collaborator Access" so iVeri support can access the shop in question and look into the order/payment details and allow Shopify support to do the same. |